
Drip Irrigation Installation Services for Planted Landscapes
Drip Irrigation Installation Services put water where a planted landscape uses it: at the soil around the roots, delivered through tubing and emitters instead of sprayed through the air. For a homeowner with shrub borders along a driveway, or a property manager responsible for planted common areas, that usually means less spray landing on paving and fences, and a watering schedule that can be managed one bed at a time.
At Landscaper-Near-Me.com, we help property owners connect with providers who handle professional drip irrigation installation, as part of the broader irrigation services available through our site. This page explains what a new installation involves, which sites suit it, what an installer should assess before any tubing goes down, and what shapes an estimate. Our aim is simple. You should be able to describe your project clearly and judge a proposal with confidence when you request a free estimate.
Most of what follows is written with residential planting beds and gardens in mind. Where multifamily, HOA, and commercial landscapes raise different questions, we point those out.

Request a Free Estimate for Drip Irrigation Installation
Tell us about your planting beds, garden, or shrub borders, and we will help you connect with a provider who can assess the site and prepare a free estimate. Call (888) 601-1117 or request a call back.
What Do Drip Irrigation Installation Services Include?
A drip irrigation system installation is the design and construction of one or more new low-volume watering zones for planted areas. The work runs from the water connection to the last emitter: a control valve, a filter, a pressure regulator, distribution tubing, emitters or inline dripline, flush points, and a controller program suited to the plants. Design decisions come first. Tubing is the part you see, but the layout, the zone boundaries, and the sizing of components decide whether the system waters evenly.
How a new installation differs from related work
Several services sound alike and are scoped quite differently:
- New installation builds a drip zone where none exists, whether in a freshly planted bed or an established garden that has been watered by hand.
- Sprinkler-to-drip conversion reuses the valve and piping of an existing spray zone. Converting planting-bed sprinklers to drip irrigation is a related project with its own compatibility checks, and we mention it only briefly on this page.
- Repair addresses a fault in a system already in the ground, such as a cut line or clogged emitters. Drip irrigation repair and troubleshooting begins with diagnosis, not design.
- Maintenance is the recurring attention every drip system needs: cleaning the filter, flushing lines, and changing the schedule as conditions change.
Knowing which category your project falls into helps when you describe it to a provider, and it keeps the estimate focused on the right scope. Many people begin by searching for “drip irrigation installers near me.” That is a sensible place to start. The more telling question is whether the installer evaluates your site before quoting.
Which Landscapes Are Good Candidates for Drip Irrigation?
Drip suits planted areas far better than lawns. Beds, borders, and gardens have plants at defined locations with bare soil or mulch between them, so delivering water to each root zone makes more sense than wetting the entire surface. Whether a particular site is suitable still depends on an on-site assessment.
Residential planting beds and gardens
Residential drip irrigation installation most often involves one of these situations:
- A newly planted landscape bed, where tubing can be laid before the mulch goes down.
- An existing garden that has outgrown hose watering. Drip irrigation for garden beds, raised vegetable beds included, can be fitted around established plants with limited digging.
- Shrub borders and foundation plantings beside walks, driveways, or walls, where spray heads tend to wet hard surfaces. Drip irrigation for shrubs and planting beds keeps the water at soil level.
- Narrow or oddly shaped strips that spray patterns cannot cover evenly.
The goals owners describe are fairly consistent: targeted watering, less overspray onto paving, and a schedule that can be adjusted for one bed without changing the rest of the yard. Drip can support those goals. It does not guarantee a lower water bill or healthier plants, because results depend on design, scheduling, and upkeep.
HOA, multifamily, and commercial planting areas
Planted common areas, entry beds, parking-lot islands, and building borders raise the same design questions at a larger scale. They also add concerns of their own, such as foot traffic, maintenance crews working around the tubing, and several controllers on one property. Managers evaluating those sites will find more detail under our commercial irrigation services.
When drip may not be the right fit
Drip is not automatically the answer. Lawns and large groundcover areas meant to be walked on are usually watered more practically with sprinklers. Beds that are dug up and replanted every season can be hard on tubing unless the layout allows for it. A site with sediment-heavy or untreated water may need more filtration than a basic setup provides. A candid assessment will say so.
What Should a Site Assessment Cover Before Design Begins?
Before anyone recommends parts, the site needs to be measured and looked at. Drip Irrigation Installation Services that skip this step are working from guesses. A careful assessment gathers the information that determines the number of zones, the type of emitter, and how the system connects to water. Expect an installer to look at:
- Planting layout and root zones. Where the plants are, how large they will become, and how much soil around each one needs to be wetted.
- Soil infiltration. Water tends to spread sideways more in clay than in sand, which affects emitter spacing and flow rate.
- Slope. Elevation changes alter pressure along a line and can let water drain to low points after the valve closes.
- Sun exposure. A bed in full afternoon sun against a wall dries faster than a shaded border under trees.
- Water supply, available flow, and operating pressure. These set how much tubing a single zone can serve.
- Existing irrigation infrastructure. Valves, mainline, controller capacity, and wiring that might be reused.
Measurements matter here. Flow and pressure taken at the supply tell a designer more than an assumption based on pipe size, and a look at the soil below the mulch shows how it actually takes in water. If an estimate arrives without anyone having checked these conditions, it is reasonable to ask how the zone sizes were decided.
You can help the visit go faster. Note which beds you want covered, which plants have struggled, where hose bibs and any existing valves are located, and whether new planting is planned for the coming seasons.
Have Your Beds, Water Supply, and Zones Assessed First
Zone layout, emitter selection, and pressure regulation all depend on what is measured on site. Ask for an assessment that covers soil, slope, available flow, and any valves or controller you already have.
How Are Plants Grouped Into Drip Zones?
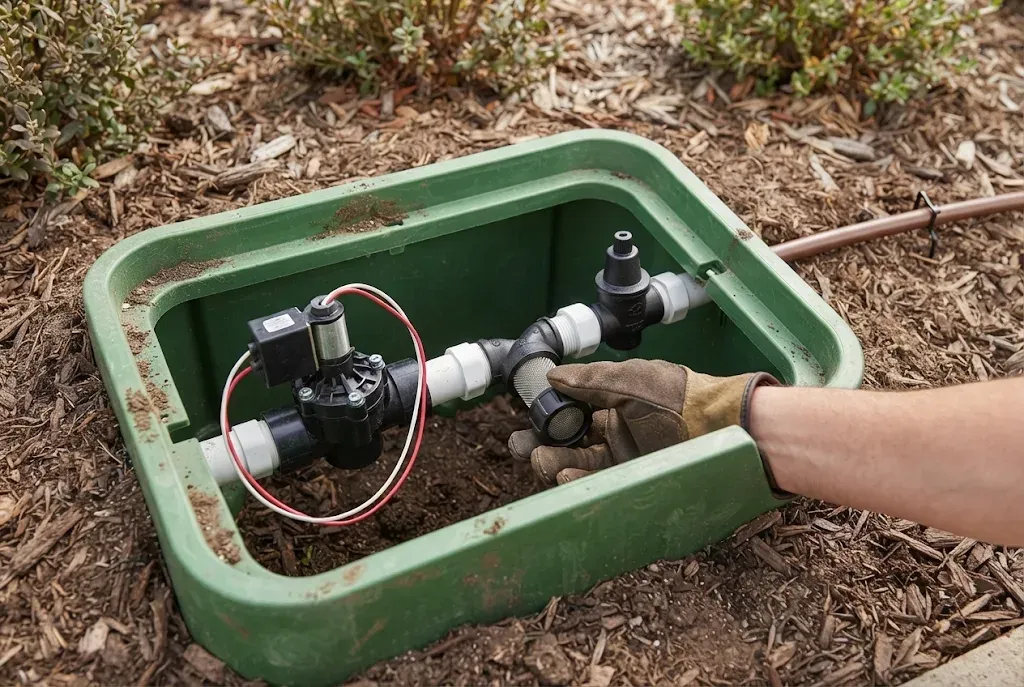
Plants with compatible water needs go on the same valve. A zone runs for one duration, so every plant on it is watered on the same schedule. Put thirsty annuals on a line with established drought-tolerant shrubs and the result is a compromise that overwaters one group or underwaters the other.
Planning irrigation zones for plants with different watering needs usually starts with a sketch of the beds marked by plant type, exposure, and maturity. From there, a designer might separate:
- Vegetable and annual beds that need frequent water during the growing season.
- Established shrubs and perennials that do better with deeper, less frequent irrigation.
- New plantings that need closer attention until their roots extend into the surrounding soil.
- Trees, which often warrant their own zone or emitters that can be added and moved outward as the canopy widens.
- Shaded beds, kept apart from beds in full sun.
Each zone also has to stay within the flow the supply can deliver. Sometimes a single large bed needs two zones for hydraulic reasons even though its plants are alike.
Lawn is a separate matter. Turf is normally watered by spray or rotor heads on zones of its own, and if your project includes lawn areas, our page on sprinkler system installation services covers that work.
Point-Source Emitters or Inline Dripline: How Is the Choice Made?
The choice follows the planting pattern. Drip tubing and emitter installation takes two main forms, and many landscapes use both.
Point-source emitters
Individual emitters are inserted into solid tubing, or fed by short lengths of small-diameter tubing, at each plant. This approach fits widely spaced shrubs, specimen plants, and containers, since water is released only where a plant is growing. More emitters can be added as plants mature.
Inline dripline
Dripline has emitters built into the tubing at regular intervals. Laid in parallel rows or a grid, it wets a continuous band of soil, which suits densely planted beds, groundcovers, hedges, and vegetable rows. Drip line installation calls for consistent row spacing and attention to maximum run lengths, so the far end of each line still receives adequate pressure.
No single emitter spacing, flow rate, or line length is correct for every site. Those values depend on the plants, the soil texture, the slope, the available pressure, and the manufacturer’s published specifications for the product being installed. Pressure-compensating emitters are often chosen where elevation changes or long runs would otherwise cause uneven output.
Where the tubing sits is a related decision. Most landscape drip is laid on the soil surface and covered with mulch, which shields it from sunlight and keeps it out of view. Some dripline products are designed for shallow burial, and whether that is appropriate depends on the product and the site. For independent background on how these low-pressure, low-flow systems work, the EPA WaterSense overview of microirrigation is a useful reference.
What Components Does a Drip Zone Need, and Where Does Backflow Protection Fit?
A drip zone is more than tubing. Between the water source and the plants, each part has a specific job:
- Control valve to turn the zone on and off, usually on a signal from the controller.
- Filter to catch particles before they reach the small passages inside emitters.
- Pressure regulator to bring supply pressure down to the range the drip components are rated for.
- Distribution tubing and fittings to carry water through the bed.
- Emitters or dripline to release it at a controlled rate.
- Flush points at the ends of lines so sediment can be cleared from time to time.
- A compatible irrigation controller able to run drip zones on a program of their own.
Backflow protection and local requirements
An irrigation system connected to a drinking-water supply generally needs backflow protection, so that water from the landscape cannot be drawn back into household or building plumbing. The type of device accepted, where it must be installed, and whether permits or periodic testing apply are set by the local water provider and building authority. We do not generalize those rules. An installer should confirm what your property already has and verify current requirements with the relevant authority before work starts.
Connecting to existing valves and controllers
Tying into existing equipment can reduce the scope of a project, provided the parts are compatible. Drip zones operate at lower pressure and much lower flow than spray zones. Some valves do not close reliably at very low flow, and an older controller may lack a spare station or the scheduling flexibility drip needs. Checking these points first avoids surprises after installation. If you are still weighing which method belongs in which part of the yard, you can compare drip irrigation and sprinkler systems on our comparison page.

Talk Through Your Drip Irrigation Project With Us
Call (888) 601-1117 or email info@landscaper-near-me.com with questions about scope, existing equipment, or timing. If you would prefer that we reach you, request a call back and we will follow up.
How Is Tubing Routed, Protected, and Tested During Installation?
Good routing keeps tubing out of harm’s way and within reach. In landscape drip irrigation installation, supply lines typically follow bed edges or run beneath mulch, and tubing is pinned with stakes so it stays in place when plants are pruned or mulch is refreshed. Lines are kept clear of spots where a shovel or edger is likely to strike during routine landscape work. Filters, regulators, valves, and flush points should stay accessible, because every one of them will need to be reached later.
In an established garden, installation is usually less disruptive than people expect. Most of the tubing sits on the soil surface under mulch, so trenching is often limited to the supply connection and any crossings beneath paths or paving. The mulch is pulled back, tubing is placed around the existing plants, and the mulch is returned. How much digging your site needs is something the assessment should spell out.
Verification before the job is finished
A drip system should be tested, not just assembled. Typical checks include:
- Flushing the lines before end caps are closed, so construction debris does not lodge in emitters.
- Running each zone and walking it to look for leaks at fittings and connections.
- Measuring operating pressure to confirm it falls within the range the components require.
- Confirming that water reaches every intended planting area and that emitters are discharging.
How Should a New Drip System Be Scheduled and Handed Over?
There is no universal runtime for drip. A schedule should reflect how established the plants are, how the soil holds moisture, the weather and season, and any watering rules that apply to the property. New plantings generally need more frequent irrigation at first, tapering as roots develop. Checking soil moisture at root depth a day after watering is a more dependable guide than a number of minutes copied from someone else’s yard.
Because drip applies water slowly, run times are usually longer than owners are used to with sprinklers. That is normal, and by itself it does not mean more water is being used. Drip irrigation maintenance and seasonal adjustments, such as shortening run times in cooler months, come with owning the system. They are not a sign that something was installed incorrectly.
What a handoff should cover
- How to operate the controller, including how to change run times and pause watering.
- Where the filter is and how to clean it.
- Where flush points and other inspection points are located.
- Signs of trouble. Dry plants on an otherwise healthy line may indicate clogging, while pooling water or a patch of mulch that stays soaked points to a leak or a dislodged fitting.
- How to add or relocate emitters as plants grow and root zones expand.
A simple drawing of where the lines run is worth asking for. It helps anyone who later plants, digs, or services the bed.
What Affects a Drip Irrigation Installation Estimate?
Properties differ enough that we do not publish prices, and any figure offered without a site review deserves caution. The main drip irrigation installation cost factors are these:
- Irrigated area and planting density. More plants and more ground to cover mean more tubing and emitters.
- Zone count. Each zone adds a valve, a filter, a regulator, and a controller station.
- Water-source access. The distance from the connection point to the beds, and what lies between them.
- Existing infrastructure. Reusable valves, wiring, and controller capacity can narrow the scope. Outdated or incompatible parts can widen it.
- Component selection. Dripline or point-source emitters, controller features, and the filtration the water calls for.
- Site accessibility. Paving crossings, slopes, mature planting, and tight access all affect labor.
- Backflow and permit requirements where the local authority calls for them.
A clear drip irrigation installation estimate lists the zones, the areas each one serves, the major components, and the testing and handoff that are included. That makes proposals much easier to compare.
Requesting a free estimate
If you have planting beds, a garden, or shrub borders that would be better served by drip, we can help you take the next step. Landscaper-Near-Me.com connects property owners with relevant irrigation providers, and drip irrigation is one of many landscape services you can ask about through our site. Call (888) 601-1117, email info@landscaper-near-me.com, or use the Request Call Back button to describe your property and arrange a free estimate for Drip Irrigation Installation Services.
FAQ's - Frequently Asked Questions
In most cases, yes. Tubing is flexible and is normally laid on the soil surface beneath the mulch, so it can be routed around existing shrubs, perennials, and trees. Digging is usually confined to the water connection and any crossings under paths. An on-site assessment confirms what your particular beds will require.
Often it can, if the controller has an open station and allows a separate program for drip. The installer should also confirm that the valve chosen for the zone works properly at low flow. When a controller is full or too limited, adding or replacing equipment may be recommended.
It depends on the size of the planted area, the number of zones, how far the beds are from the water source, and how easy the site is to work in. A provider can give you a realistic timeline once the property has been assessed and the scope is defined.
Not usually. In landscape beds, tubing is commonly placed on the soil surface, pinned in place, and covered with mulch. Some dripline is made for shallow burial. Whether that is appropriate depends on the manufacturer’s specifications and your site, so it is a point to raise during the estimate.
It can reduce water lost to overspray and runoff, but we do not promise savings. Actual use depends on how the system is designed, how it is scheduled, the weather, and how well it is maintained. A drip zone that is left running too long can use more water than necessary.
Expect to clean the filter, flush the lines, and walk each zone while it is running to look for leaks or clogged emitters. How often depends on your water quality and the manufacturer’s guidance. Emitters may also need to be added or moved as plants grow.
Rules differ from one water provider to another and can change with conditions. Some treat drip differently from sprinklers and some do not. Check the current requirements with your local water provider, and set the controller to match them.
We connect property owners with relevant irrigation services and providers. When you call (888) 601-1117 or request a call back, we take down the details of your planting areas and help you arrange a free estimate for the work.