
How to Help New Sod Take Root: First Steps, Watering, and Early Checks
New sod looks finished the moment the last roll goes down, but underneath it the real work has barely started. Every piece is a mat of grass sitting on top of bare soil, and until its roots push down into that soil, the lawn is living off whatever moisture it can hold in a thin layer of cut roots and thatch. Knowing how to help new sod take root comes down to two jobs: keeping the sod pressed firmly against moist soil, and noticing early when a section isn’t attaching the way the rest of the lawn is.
This guide starts with what you can do today, right after installation, and then works through the checks we use to judge whether roots are forming. We cover sod-to-soil contact, how to read moisture beneath the sod rather than on top of it, how to adjust irrigation as conditions change, and how to troubleshoot loose edges, dry strips, and soggy corners. Rooting timelines and general aftercare are covered only briefly here, because we have separate guides for those topics. The focus of this page is the roots themselves: encouraging them, testing them, and figuring out what’s wrong when they don’t show up.
If you only have a few minutes right now, these are the priorities for a freshly laid lawn:
- Water the new sod thoroughly so the soil directly underneath is moist, not just the grass blades.
- Walk the seams and edges and press down any piece that is curled, raised, or not touching its neighbor.
- Keep people, pets, and equipment off the lawn except when you need to check it.
- Lift one accessible corner later in the day to confirm the soil underneath is still damp.

Free Estimates on Sod Installation and Patch Replacement
Planning a new lawn, or replacing sod that never anchored? We prepare the soil, lay the sod tight, and set up the watering so roots have what they need from day one. Call (888) 601-1117 or email info@landscaper-near-me.com to request your free estimate.
What Should You Do in the First Few Hours After New Sod Is Laid?
The first watering matters more than any other. Sod is often cut a day or more before it is installed, and the pieces lose moisture while stacked on pallets in the sun. As soon as an area is laid, it should be watered heavily enough that the water passes through the sod and wets the soil beneath it. A quick sprinkle that darkens the grass blades does very little for root growth, because the roots that need to develop are at the bottom of the mat, not at the top.
After that first soak, take a slow walk around the perimeter and along every seam. You are looking for three things: edges that have curled upward, gaps where two pieces have pulled apart, and soft spots where the sod seems to float over a hollow. Press raised edges down by hand or with the flat of your foot, and push shrinking pieces back toward each other so the seams close. If the installer used a lawn roller, most of this has already been done, but pieces near walkways, sprinkler heads, and curved bed lines are easy to miss.
Mark the problem spots now
It helps to note where the trouble areas are on the first day. A corner by the driveway that dries quickly, a low strip along the fence that stays wet, or a seam that kept lifting while you pressed it are the places that will tell you the most over the next couple of weeks. When you check rooting later, comparing these spots with a healthy section in the middle of the lawn makes the difference much easier to see.
Hold off on everything else
New sod does not need fertilizer, weed treatments, or aeration in its first days. The most effective ways to encourage root growth in new sod are simpler: firm contact, steady moisture, and leaving it alone. Most problems that show up in week two started with something in the first 48 hours: a dry edge, a heavy footprint, or a sprinkler zone that never reached one corner.
Why Does Sod-to-Soil Contact Decide Whether Roots Can Grow?
Roots can only grow into soil they can reach. When the underside of the sod sits tight against moist, loosened soil, new roots move across that boundary within days in good conditions. When there is an air gap, even a small one, the roots dry out at the tip before they can anchor. That is why firm sod-to-soil contact is the foundation of everything else on this page. Watering cannot fully make up for sod that is resting on a ridge, a clod, or a pocket of air.
Poor contact usually comes from the installation stage. Soil that was not raked smooth leaves high and low spots. Rocks or chunks of old turf can hold a piece of sod up like a tent. Soil that was bone dry when the sod went down can shed water instead of absorbing it, leaving the bottom of the mat damp while the ground underneath stays dusty. Heavily compacted ground is another common cause; roots struggle to push into it, which is why learning how to prepare compacted soil before laying sod pays off on future projects.
Signs of an air gap or weak contact
- A section that feels spongy or hollow when you press it, compared with firm sod nearby.
- Edges that spring back up shortly after you push them down.
- Strips that turn dull or grayish faster than the rest of the lawn even though they get the same water.
- Visible soil or a gap at the seam where the sod has shrunk back.
Pressing and rolling solve light problems. If a piece is sitting on debris or a high spot, the better fix is to lift it, rake or remove what’s underneath, moisten the soil, and lay it back down. Loose edges and air gaps that keep returning after you press them are installation issues worth raising with whoever laid the lawn.
How Much Water Does New Sod Need for Root Growth?
Watering new sod for root growth means keeping the top few inches of soil beneath the sod consistently moist, without turning it into mud. The target is the soil surface right under the mat, because that is where new roots are trying to grow. The University of California IPM guidance on irrigating newly installed turf recommends daily watering for the first few weeks, more often in hot weather, and keeping the soil under the turf moist while avoiding saturating it.
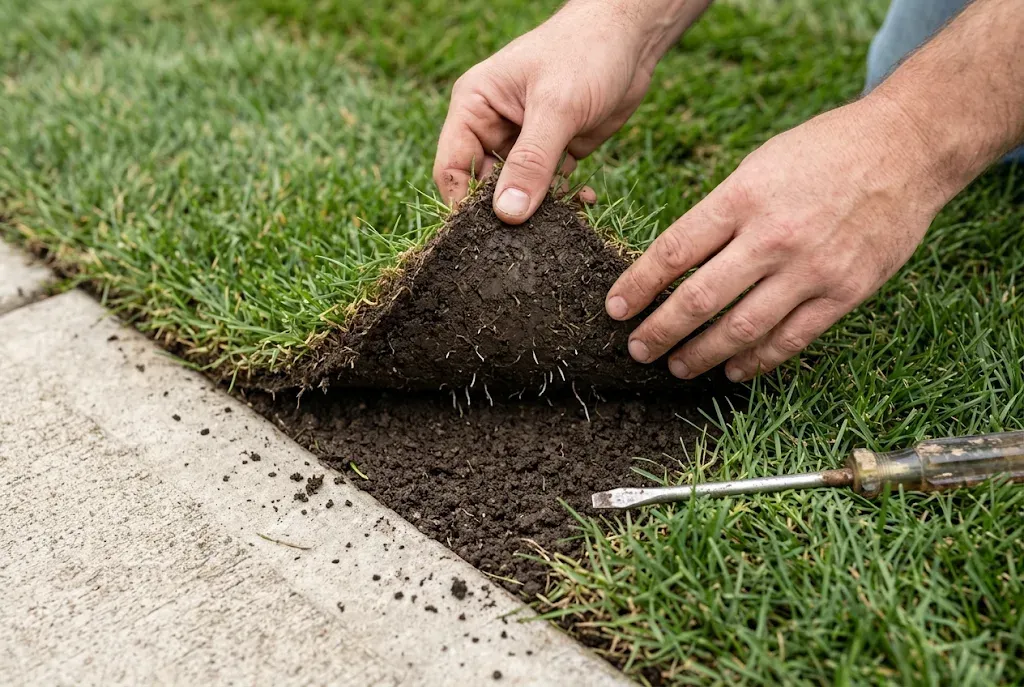
The simplest way to know whether you are getting it right is to look under the sod. Pick an accessible edge, such as a corner along a walkway, gently fold it back an inch or two, and feel the soil. It should be damp to the touch, like a wrung-out sponge. If it’s dry and crumbly, the watering isn’t reaching deep enough or often enough. If water pools or the soil smears like wet clay, the lawn is getting more than it can drain. Lay the corner back down and press it firmly when you’re done.
A screwdriver tells you about depth
Pushing a long screwdriver into the lawn is another quick check. In moist soil it slides in easily; it gets harder to push once it hits dry ground. Testing a few spots after a watering cycle shows you how deep the water actually traveled, which is useful when you are deciding whether to lengthen run times or add another cycle.
Watch the color, not the clock
A schedule gets you started, but the sod will tell you when it isn’t enough. Grass that takes on a dull, bluish-gray cast, or blades that fold and stay folded, is losing water faster than it is getting it. Edges and narrow strips usually show this first. Responding to those early cues with a short extra cycle is far easier than reviving sod that has browned and pulled away from the soil.
Dry Seams or Soggy Corners? Let Us Check Your Sprinkler Coverage
When one strip of new sod roots and another doesn’t, uneven irrigation is often the reason. We can test each zone, adjust heads around the new lawn, and repair what’s leaking or blocked so every section gets the moisture it needs. Reach us at (888) 601-1117.
How Should You Adjust Irrigation for Weather, Turf Type, Soil, and Drainage?
No single watering schedule fits every new lawn. The right amount depends on what the sod is made of, what it is sitting on, and what the weather is doing that week. A schedule that works perfectly in mild, overcast weather can leave the same lawn dry by mid-afternoon during a warm, windy spell.
Weather
Heat, wind, and low humidity all pull moisture out of the thin sod layer quickly. During those stretches, splitting the daily water into two or more short cycles keeps the soil surface from drying out between waterings. Cool, cloudy weather and rain slow evaporation, and continuing the same heavy schedule through those days is one of the most common reasons a new lawn ends up waterlogged. Watering earlier in the day also gives the grass time to dry before evening, which helps limit disease.
Turf type
Warm-season grasses such as hybrid bermudagrass and St. Augustine root most actively when soil is warm, while cool-season grasses such as tall fescue handle cooler temperatures better. Sod laid outside its preferred growing season may root more slowly, which means the careful watering period can last longer. Ask your installer or sod supplier what variety you have, since that affects both rooting speed and later mowing height.
Soil and drainage
Sandy soil drains fast and may need shorter, more frequent cycles. Clay soil holds water longer and can shed it if it’s applied too quickly, so cycling the water on and off with a pause in between helps it soak in rather than run off. Slopes deserve the same treatment, because water tends to run toward the bottom and leave the top edge dry. Low areas, especially near downspouts or fences, may need less water than the rest of the zone.
What Causes Dry Edges, Missed Sprinkler Coverage, and Soggy Spots?
Uneven moisture is behind most uneven rooting, and it usually has a physical cause you can find. When one part of the lawn behaves differently from the rest, the first question is whether that area is actually receiving the same water.
Dry edges
The outside edges of new sod are exposed on more than one side. Edges along concrete, driveways, and block walls also pick up reflected heat. They dry faster, shrink more, and are the first to lift. Hand watering the perimeter for a minute or two after the regular cycle often solves the problem. If an edge stays dry anyway, look at whether the sprinkler pattern actually reaches it.
Missed sprinkler coverage
Sprinkler systems designed for an older lawn, or adjusted around a previous planting, can leave gaps when new sod goes in. Heads may be tilted, set too low and blocked by the thicker sod, clogged, or aimed at the sidewalk. Running each zone while you watch is the easiest way to catch this; knowing how to check sprinkler coverage on a new lawn can save a whole section from drying out. Placing a few shallow, straight-sided containers around the zone and comparing how much water collects in each will show you where coverage is thin. Broken heads, leaking valves, and pressure problems are outside normal aftercare; our sprinkler repair services cover those repairs.
Persistent saturation
Sod that stays soggy can fail just as surely as sod that dries out. Roots need air as well as water, and soil that never drains starves them of oxygen. Signs include standing water hours after a cycle, a sour smell, mushy soil when you lift a corner, and grass that yellows despite plenty of water. Reduce run times in that zone first. If the area still won’t drain, the cause may be a low grade, compacted subsoil, a leaking valve, or runoff from a downspout or neighboring yard.
How to Tell If New Sod Is Taking Root
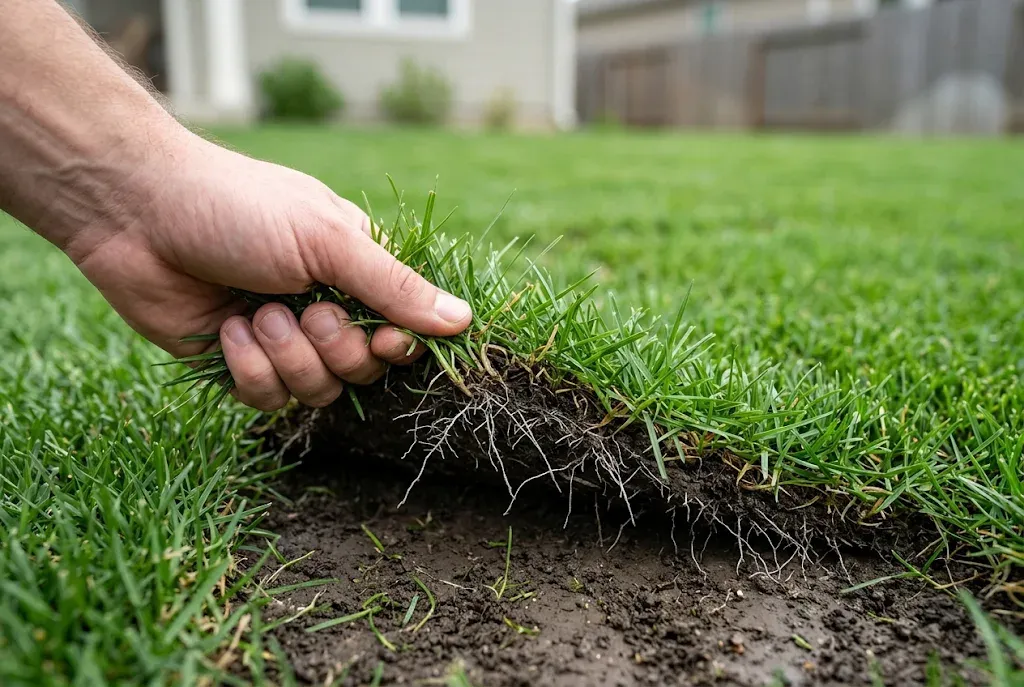
The most reliable way to learn how to tell if new sod is taking root is a gentle tug. Grip the grass in the middle of a piece, not at a seam, and pull upward lightly. Sod that has not rooted lifts freely, like a rug. Sod that has started to anchor resists; you feel the soil holding it, and when you peek underneath at an edge, you can see fine white roots reaching into the ground.
Test several representative spots rather than one. Include a healthy section near the center of the lawn, a sunny edge, a shaded area, and any trouble spot you noted on the first day. Different areas often root at different rates, and comparing them shows you where conditions are holding things back. Be careful not to rip sod loose while testing. If a piece comes up easily, press it firmly back down and water it.
Other early cues
- Seams that stay closed instead of opening as the sod dries.
- Grass color that stays even across the lawn, without dull patches.
- Edges that stay flat on their own between waterings.
- New growth that makes the lawn look ready for its first trim.
Rooting speed varies with season, turf type, and soil. In favorable conditions, sod commonly begins to anchor within roughly two weeks, but cooler weather or less-than-ideal soil can stretch that. For a fuller look at the timeline, see our guide on how long sod takes to root.
Sod Still Lifting? Talk With a Landscaper Before It Gets Worse
If you’ve pressed the edges, adjusted the watering, and parts of the lawn still pull up freely, we’ll help you find out why. Request a call back, phone (888) 601-1117, or email info@landscaper-near-me.com to talk through your lawn.
When to Reduce Watering After Sod Takes Root
Knowing when to reduce watering after sod takes root keeps the lawn from depending on constant surface moisture. Once the tug test shows firm resistance in most areas, it is time to start changing the pattern. The goal now is to send roots deeper, and roots follow water. Frequent shallow watering keeps them near the surface, where they are vulnerable to heat and dry spells. Deeper, less frequent watering encourages them to grow down.
Make the change gradually. Reduce the number of daily cycles first, then move toward watering every other day with somewhat longer run times, and continue stretching the interval as the lawn shows it can handle it. UC guidance notes that an established lawn often does well with about two waterings a week, though the right amount depends on your weather, soil, and grass type. Between waterings, the top of the soil should begin to dry slightly while deeper soil remains moist.
Not every part of the lawn has to change at the same time. If the center passes the tug test but a sunny edge or a recently patched area still lifts, keep extra hand watering on that section while the rest of the lawn transitions. If the grass shows stress after you cut back, such as color loss or footprints that stay pressed down, step back to the previous schedule for a few days before trying again.
Protecting Anchored Sod: Foot Traffic and the First Mow
Traffic is hard on new sod because each step pushes the mat against soft, wet soil and can shear off young roots. Until the sod is firmly anchored, keep walking to the minimum needed to check moisture and move hoses. Kids, pets, and wheeled equipment should stay off it entirely. Footprints that stay visible or soil that oozes when you step are signs the lawn is too wet and soft to handle any traffic.
The first mow should wait until two things are true: the sod resists the tug test across the lawn, and the soil is firm enough that a mower won’t shift pieces or leave ruts. Let the surface dry a bit before mowing by skipping or shortening that morning’s cycle. Use a sharp blade, set the mower high for your grass type, and avoid removing more than about one-third of the blade at a time. Turn gently at the ends of each pass so the wheels don’t twist the sod. A lightweight push mower is easier on a young lawn than a heavy riding mower.
For a broader overview of fertilizing, ongoing watering, and the weeks after establishment, read our guide on how to care for sod after laying it.
Why New Sod Is Not Rooting Evenly, and When to Call for an Assessment
When parts of a lawn root and others don’t, the answer is usually found by comparison. Look at a healthy section and a problem area side by side, and work through the same questions in both places. That approach turns a vague worry about why new sod is not rooting into a specific cause you can address.
Questions to work through
- Is the soil beneath dry? Lift an edge in each area. If the problem area is drier, look at sprinkler coverage, slope, or reflected heat.
- Is water pooling? Soggy, sour-smelling soil points to overwatering, poor drainage, or a leaking valve.
- Is the sod making contact? A hollow feel or a piece that rocks underfoot suggests debris, uneven grading, or compacted soil underneath.
- Is the area getting traffic? Pathways to a gate, a trash can route, or a spot where pets run can tear young roots repeatedly.
- Is the area shaded? Sod laid in heavy shade may root slowly if the grass variety is not suited to it.
New sod lifting at the edges
New sod lifting at the edges deserves its own look because it combines several of these causes. Edges dry first, shrink first, and get stepped on when people cross the border of a lawn. Press them down, water them by hand, and make sure the sprinkler pattern reaches them. If edges keep curling after a week of attention, the soil underneath may be too high, too dry, or too compacted for roots to enter, and lifting and resetting those pieces is usually the faster fix.
When it makes sense to bring in help
Some problems go beyond aftercare. Sod that still lifts freely across large areas after a reasonable rooting period, recurring gaps at seams, wide dry zones that persist after you adjust run times, or wet spots that never drain usually point to a grading, soil, or irrigation issue. An installer can evaluate the soil and contact problems, and an irrigation technician can test coverage, pressure, and valves. Our professional sod installation services cover preparing the soil and laying new sod, and our team can also look at the sprinkler zones serving a new lawn.
In the end, how to help new sod take root is mostly a matter of patience paired with attention: firm contact, steady moisture beneath the mat, and a willingness to look under a corner instead of guessing. If you’ve worked through those checks and parts of your lawn still won’t anchor, call Landscaper-Near-Me.com at (888) 601-1117 or email info@landscaper-near-me.com. We serve homeowners across Southeast Los Angeles County and Orange County, and we’re glad to take a look and talk through a free estimate for whatever repairs the lawn needs.
FAQ's - Frequently Asked Questions
Brief, careful trips are fine when you need to move a hose or check moisture. Step lightly, use the same path each time, and avoid walking on it when the soil is soft enough to leave deep footprints. Laying a board down spreads your weight if you need to cross the same area repeatedly.
Fertilizer is not a substitute for good contact and moisture, and too much nitrogen early can push top growth instead of roots. Many sod growers prepare the soil or apply a starter product at installation, so ask your installer what was used before adding more. We generally wait until the sod is anchored before feeding.
Some color change can happen as sod adjusts after being cut and moved. Patches that keep spreading, especially along edges or in one sprinkler zone, usually point to dry soil, standing water, or poor contact. Lift a corner in the affected area and compare it with a healthy spot.
Gaps at seams usually mean the sod is drying and shrinking. Push the pieces back together, water the seam thoroughly, and add a short extra watering cycle in hot or windy weather. If a gap stays open, filling it with a small amount of topsoil can help keep the edges from drying out.
Early morning is usually the better choice. Watering in the evening leaves the grass wet overnight, which can encourage disease. In very hot weather, a short midday cycle can help keep the surface from drying out, but the main watering should be early in the day.
It can, but a light shower often wets only the grass blades. After rain, lift a corner to see whether the soil underneath is actually moist before skipping a cycle. After a heavy rain, pause the irrigation so the soil can drain.
It can, but roots enter compacted clay slowly, and clay tends to stay wet. Water in shorter cycles with pauses so it soaks in, and check for pooling. For future projects, learning how to prepare compacted soil before laying sod is the best way to avoid this problem.
We serve residential properties across Southeast Los Angeles County and Orange County, including Whittier, Downey, Cerritos, Long Beach, Anaheim, Fullerton, Santa Ana, Irvine, Costa Mesa, and Newport Beach. Call (888) 601-1117 to ask about a sod or irrigation visit.